Advertising campaigns may not reach desired KPIs for various reasons and one of them is fraudulent traffic. The damage caused by fraud costs the advertising industry billions of dollars yearly. Fake clicks on ads and app installs generated by bots and malicious programs have direct and indirect impacts on advertising outcomes. The direct consequence of fraud is a wasted ad budget that may be spent on those impressions that will never be seen by real people, thus, they will never convert. However, the indirect impact is even more dangerous, as fraud negatively affects marketing decisions, user loyalty, and audience targeting in the long term.
The good news is, to effectively tackle the problem with ad fraud, ad exchange owners don’t have to learn the specifics and mechanics of each fraudulent activity. You probably know that Attekmi solutions provide the opportunity to integrate ad fraud detection tools and scanners that effectively protect your ad exchange from threats. Today we’ve prepared a comprehensive guide that will not only walk you through all types of scanners that can be integrated but will also show you how to set up and use them.
TMT
TMT is a demand scanner that busts fraud and safeguards the system from malicious creatives. First, the system compares responses with TMT whitelists, if they are not here it sends their CrIDs for further checking. With this one, you can check banners or native creatives as video so far is not supported by TMT.
How to configure and use it? TMT belongs to those scanners the integration of which you need to negotiate when your platform is being deployed. Thus, make sure you have it discussed with the installation team. As soon as you have it in your system you will be able to define daily scan limits.
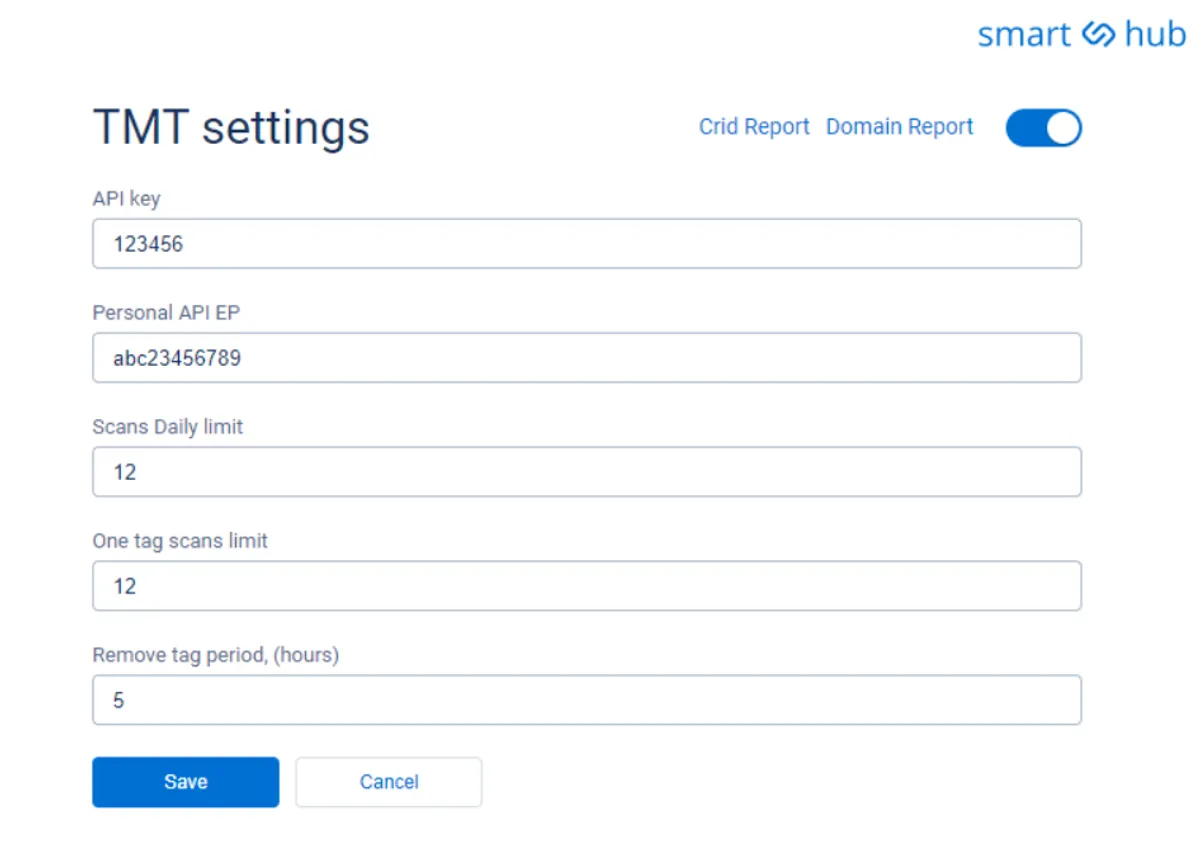
Fill in the TMT scanner access key to the “API key” field, then the Personal API EP – API endpoint link (provided by TMT). In the daily limit scans, you should put a maximum number of scans per day. One tag scan limit is for the number of scans for one tag (per day). ‘Remove tag period (hours)’ defines the number of hours after which the tag will be deleted from the TMT database. You can also generate a Crid report and Domain report to see blocked tags statistics in the dashboard.
Forensiq
The Forensiq scanner doesn’t only fight ad fraud of various origins, it constantly monitors traffic for abnormalities and checks every impression if it meets their fraud score scale. The impression is only labeled as viewable if it corresponds to the traffic quality and brand safety metrics developed by Forensiq. SIVT & GIVT fraud detection is enabled for many channels and you can scan your media-trading environment as well.
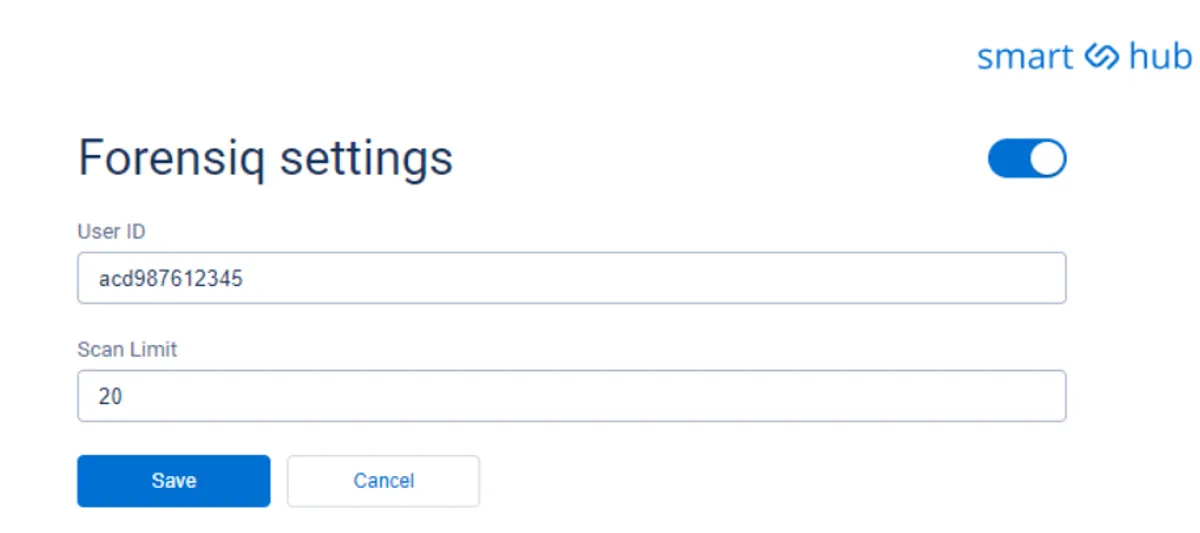
How to configure and use it? You can find the Forensiq scanner in the scanner section of your dashboard. To make it work, you need to set the User ID – tag (‘Org ID’) and Scan Limit – the overall number of scans per day. Set it up to your needs and get a fully transparent picture of how your traffic is being scanned and how many threats it actually prevents (in reports). Later on, in the section scanner stats, you’ll be able to discover how many threats were prevented by Forensiq in your marketplace.
Protected Media
Protected Media is a supply scanner that utilizes AI and ML technologies to scan traffic on SSP endpoints before and after it reaches DSPs. What’s peculiar, this scanner protects impressions on both pre and post-bid levels which means it can detect fraud in real time and also prevent it from happening before the impression is served. The post-bid function also gives valuable insights as to where the fraud originated (reveals sources). With Protected Media, you can scan display, video, and CTV traffic.
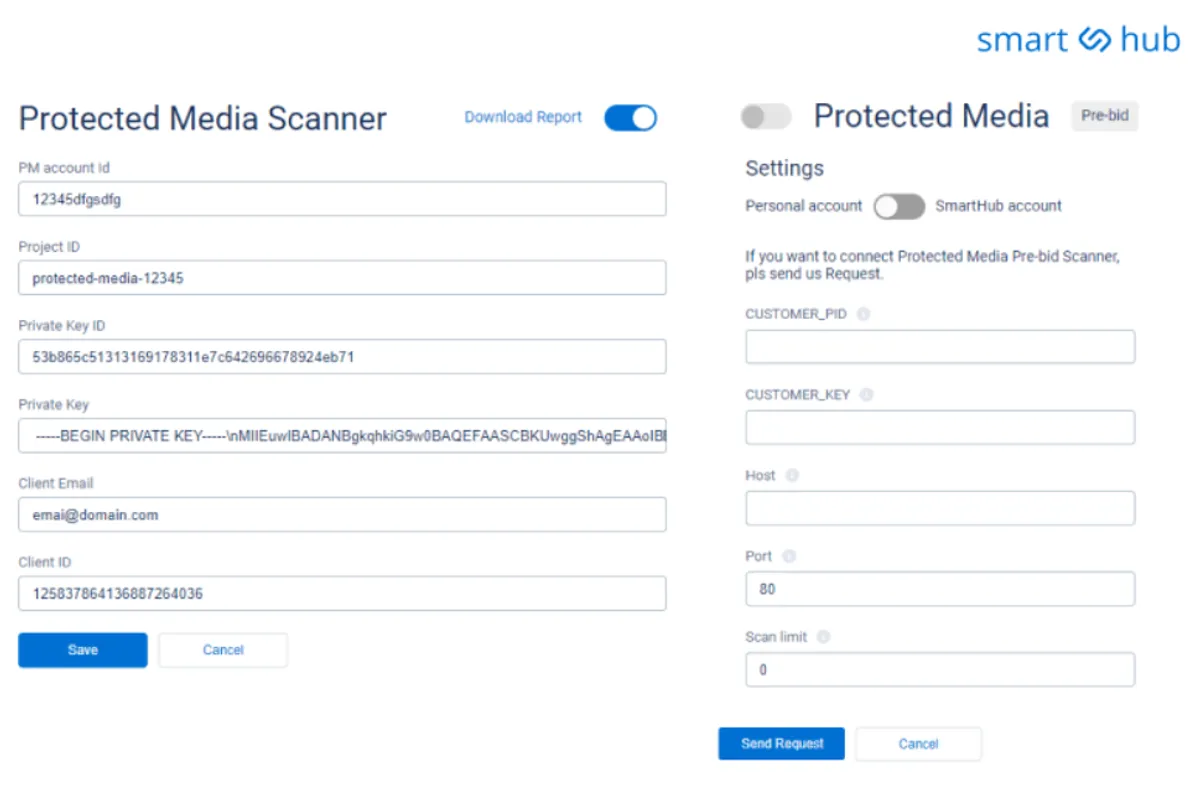
How to configure and use it? To scan your system with a Protected Media scanner in the main section open an endpoint section and tick off the checkbox that says “Scan with Protected Media” – after this, you will be able to scan traffic. For the pre-bid scanning, you only need to enter the number of daily scans needed (0 is for all traffic), the rest of the fields will be provided by Protected Media. In post-bid, Protected Media will only provide you with PID (Partner ID) value. To fill out all other fields you need a service account on Gmail.
Pixalate
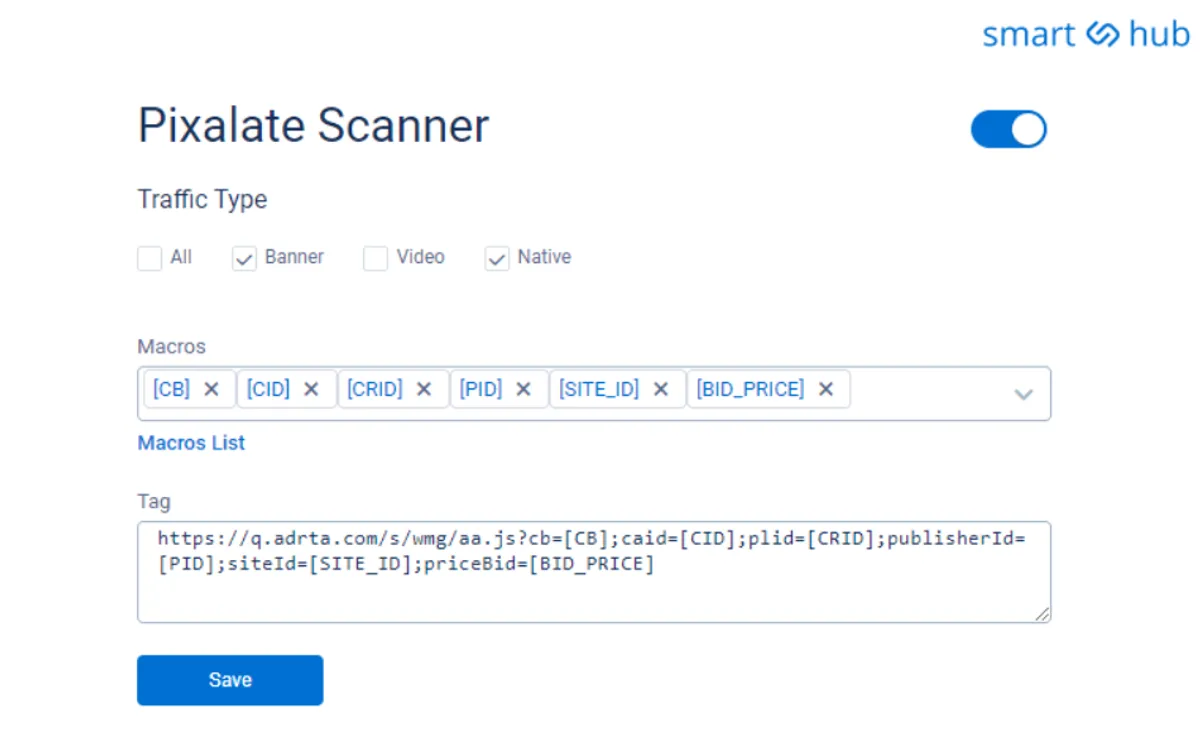
Pixalate is a supply fraud detection scanner that enables intelligent fraud identification and analysis based on smart machine learning algorithms. Just like Protected Media, this one can scan pre and post-bid meaning that traffic is investigated for fraud even before requests reach DSPs, and, when the fraud is detected you can investigate the origins of fraud. With Pixalate you are free to scan In-app, display, video, CTV, and OTT traffic types. With the increasing consumption of content on mobile devices, mobile video advertising has become a pivotal tool for brands to engage with their target audience.
How to configure and use it? To enable the Pixalate scanner find it in the scanner section of your dashboard and turn it on. Then, select the traffic types that you want to be scanned: Banner, Video, Native, All. Pixalate applies macroses for traffic scanning as well as IMG pixels that you can also choose for yourself.
GeoEdge
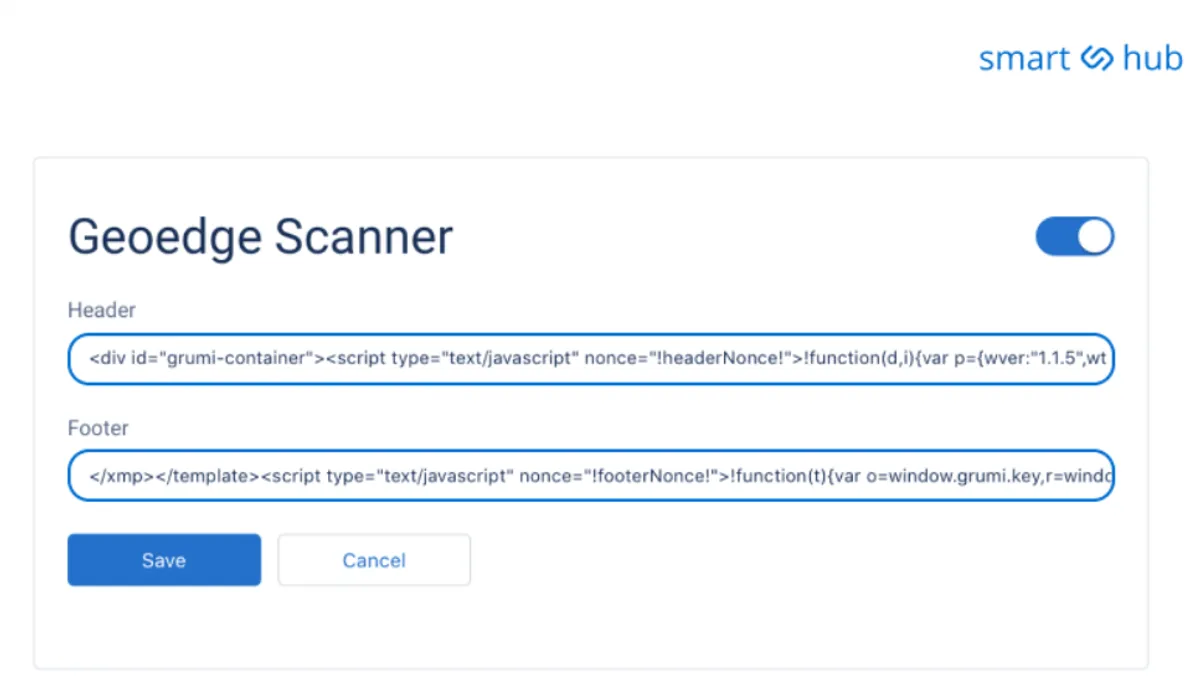
GeoEdge demand scanner is made to alleviate security threats and prevent ad fraud from harming ad impressions. When SSP gets a response the scanner will wrap each in <header> and <footer> tags. Such tags will restrict the creatives that contain redirects, plus they will enable sending alerts about such activity. You will see alerts about such creatives in the GeoEdge Admin panel.
How to configure and use it? Find GeoEdge in the list of scanners and turn it on, after this set the tag header which you can get from the GeoEdge header.txt file and footer.txt. After you save changes you can select SSP endpoints for scanning. Once you have GeoEdge working for some time you can select “Go to Report” in the scanner section and see how many threats it blocked. Choose what you want to see – Blocked sources, blocked IPs, etc, and generate a report.
Botman
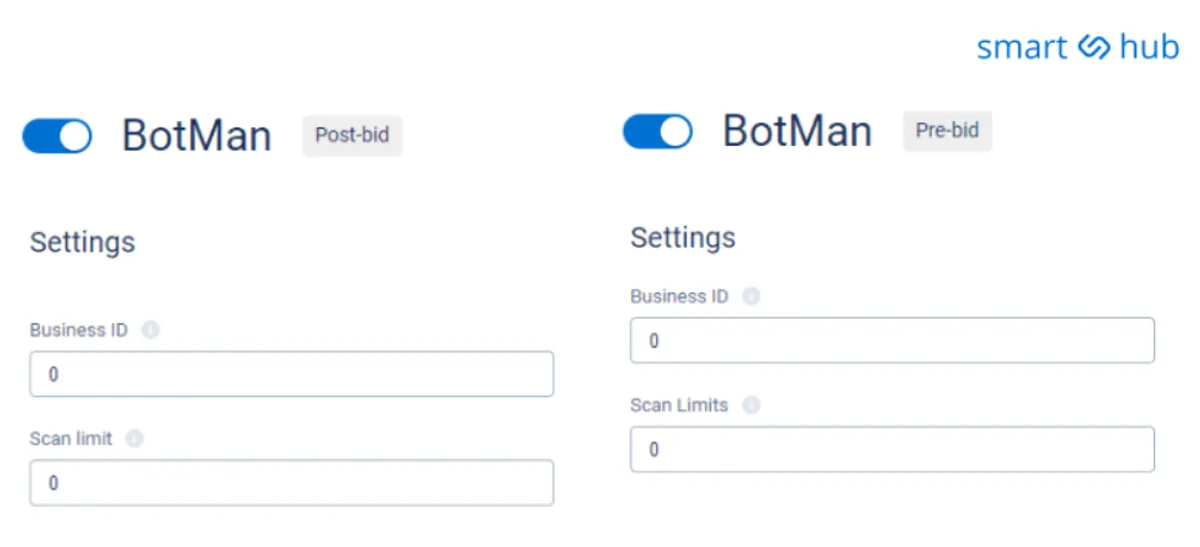
Botman utilizes various technologies and filters in order to protect advertising traffic from fraud. What is peculiar about this scanner is that it provides impeccable GIVT & SIVT protection across inventories both pre and post-bid.
How to configure and use it? Botman Pre-bid integration can be set up in the Scanners section. After connecting to the UI you can select the SSP endpoints for which you desire to scan the traffic. Also, you can select the DSP endpoints where the scanned traffic must be sent. The post-bid integration will verify the source of the impression utilizing pixels in the bid response. You can choose SSP endpoints the traffic of which must be scanned, or DSP endpoint where the scanned traffic must be sent. To see each configuration step in detail, see the Botman installation guide.
Scalarr
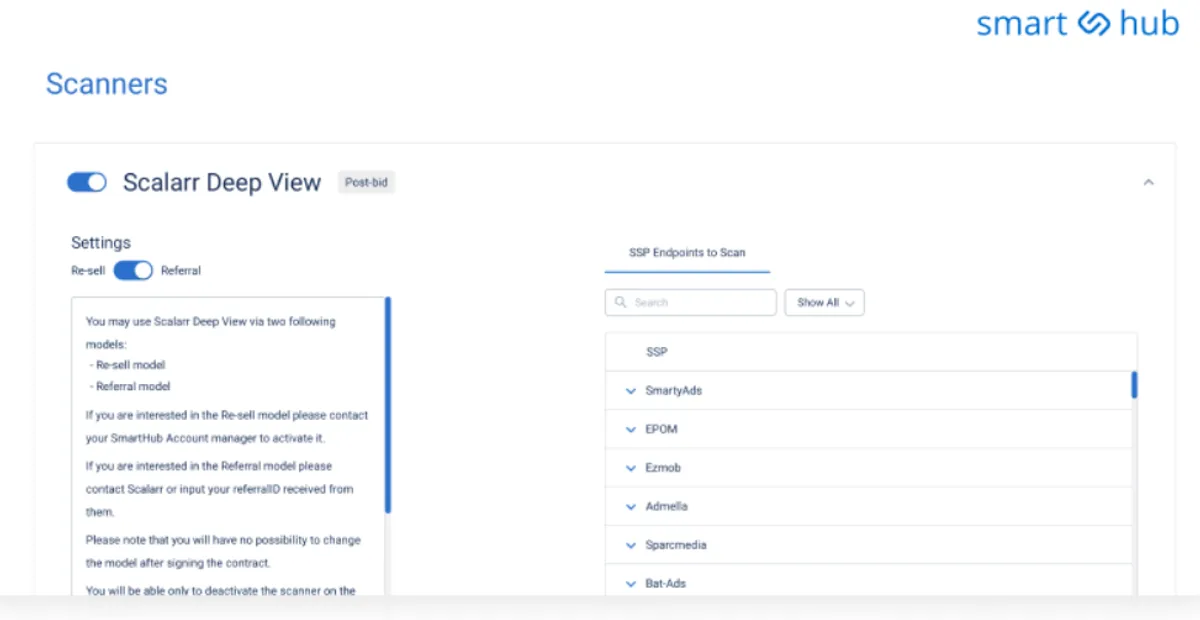
Scalarr traffic scanner effectively eradicates and prevents advertising-specific fraud in different environments and across various channels. The scanner eliminates IVT levels whilst spotting and analyzing even the smallest traffic anomalies and threat signals. The mechanisms of their DeepView™ scanning solution automatically detect vulnerabilities and potential threats in the system.
How to configure and use it? Scalarr integration is available for both pre-bid and post-bid. The post-bid (deep view) also gives insights as to where the threat originated (source). You can either contact your Attekmi manager to negotiate payment and activate it, or you can contact the Scalarr manager directly, then you’ll have to put your referral ID in the system (provided by Scalarr). After installation, you will be able to choose endpoints to scan and configure the daily limit of scans.
WhiteOps
Scanning capabilities of the WhiteOps are represented by the strongest anti-fraud mechanisms that aptly detect and prevent ad fraud in major AdTech systems. Thanks to their scanning system it becomes possible to discover sources that generate IVT and pinpoint blocked pre-bid IVT over time. The scanner enables protection across desktop, mobile, and CTV environments.
How to configure and use it? Instead of direct integration with a scanner, your platform utilizes WhiteOps HUMAN’s detection tags, which are getting integrated via Pixels. Thanks to this system each impression is automatically evaluated before it reaches RTB auction. In order to activate the scanner, you need to contact your Attekmi manager and negotiate the conditions.
The last word
Now that you have explored a variety of efficient scanners that can be integrated into your solution, you understand how important ad fraud tools are in programmatic.
Advertising can be effective only when it is seen and clicked by real users, not bots/botnets and malicious software that mimics human behavior. All kinds of ad fraud that generate fake traffic wreak havoc on advertising budgets and harm a brand’s reputation. The impact of a cookieless future is reshaping the advertising industry, prompting businesses to adopt new strategies and tools for audience targeting. However, the programmatic advertising industry is a flexible environment that adapts quickly and regularly introduces new anti-fraud scanners and protocols like adx.txt and sellers.json which authorize legitimate sellers, resellers, and their inventory. In response to evolving privacy concerns, cookieless ads offer a promising solution for advertisers to reach their audience without compromising user privacy. Tracking every new security breach and preventing it is very difficult. Understanding this we are doing the utmost we can to equip your system with best-in-class traffic safety scanners and IAB safety standards.
Use our full detailed scanner guide to go through every step of the installation and keep your system healthy and secure at all times.
Interested in getting a safe marketplace from Attekmi? Let’s get in touch.
 By Iryna Kozirevych